

How To Add A Realalist Background In 3ds Max
In this lesson, you have a daylight epitome of a desert mural, adjust its output to resemble nighttime lighting conditions, then comprise the effect into the scene as a background. Yous'll add together a Glare result to heighten the appearance of the lights, then introduce a few more photometric lights to illuminate the interior of i billet.
Ready the lesson:
- Continue working on your own scene file or in the \lighting_and_rendering\army_compound folder,
 open army_compound_lighting_no_bkrnd.max.
Add a background prototype:
- Open up the Rendering menu and choose Environment to open the Surround And Furnishings dialog. On the Mutual Parameters rollout, click the Environs Map button (at present, the text on the push button says ("None").

3ds Max opens the Material/Map Browser.

- On the Cloth/Map Browser, double-click the Bitmap map type. (Bitmap is in the Maps
 Standard group.)
 3ds Max opens a file dialog.
- In the file dialog, navigate to the \sceneassets\images folder, click desert.jpg to highlight information technology, and then click Open.
The image is a desert landscape, taken during the day.
- On the Exposure Control rollout make sure Process Background And Environs Maps is off.

When this option is turned on, 3ds Max applies the exposure command to the background map itself. For most bitmaps (those that don't salve a high dynamic range), in issue this makes the background and other environment maps invisible.
- Make sure no object is selected, correct-click a viewport, and from the quad menu, choose Hide Unselected.
-
 Return the Camera01 viewport.
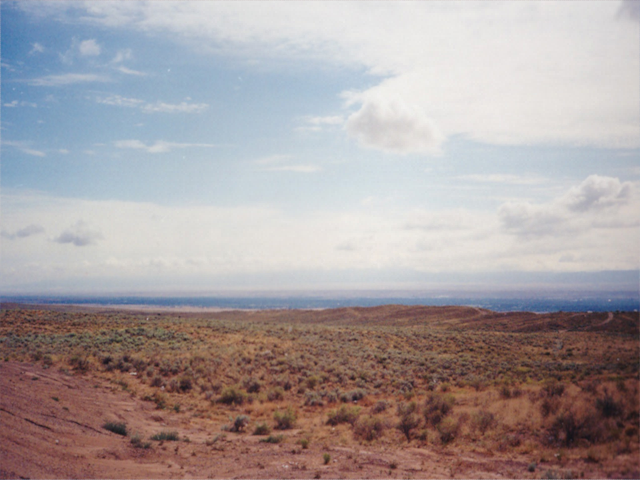
With all objects hidden, 3ds Max has rendered only the background paradigm. It is apparent that y'all will need to make the epitome darker and so it suits the nighttime scene.
Exit the Environment And Effects dialog open for now.
Adjust the background image:
- Open up the
 Slate Cloth Editor.
 - In the Material/Map Browser panel on the left, navigate to the Sample Slots group.
- Drag the Environment Map button from the Environment And Effects dialog and drop it onto an unused sample slot. The sample slot shows a red bar across it when yous are able to drop the map.

3ds Max asks if this should exist an example or a copy. Make sure Instance is selected, and then click OK.
-
 Close the Environment And Effects dialog.
 - Drag the sample slot with the environment map into the active View.
Over again, 3ds Max asks if this should be an instance or a copy. Make sure Instance is selected, and and then click OK.
- In the active View, double-click the Bitmap node then you can encounter its parameters in the Parameter Editor panel to the right.
- On the Output rollout, decrease the Output Amount to 0.033.

- Render the Camera01 viewport over again.
The upshot is a heavily underexposed image, resembling a nighttime sky: a digital version of filming "day for night."
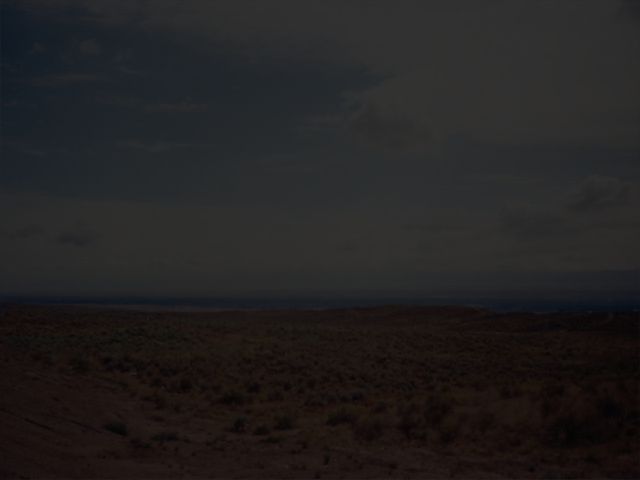
Groundwork bitmap heavily underexposed to suit nighttime scene
- Correct-click the Camera01 viewport, select Unhide All from the quad menu, and then render the scene again.

Bitmap image added to scene groundwork
The background adds depth and involvement to the scene.
- Close the Slate Cloth Editor.
Add a Glare consequence:
mental ray provides a number of special effects designed to give light objects added realism. Here, you volition add a Glare effect to the regular army compound lights, to simulate their interaction with grit particles and ambient humidity.
- Click
 (Render Setup). On the Return Setup dialog, go to the Renderer tab. In the Camera Effects rollout Camera Shaders grouping, turn on the Output shader toggle.
Every bit the shader button shows, mental ray provides a Glare shader as a default shader for camera output, but past default this shader is turned off, and then yous have to enable it "by hand."
- Open up the Slate Material Editor, and move it so you can see both dialogs.
- In the Textile/Map Browser console on the left, navigate to the Sample Slots grouping.
- Elevate the Photographic camera Shaders Output button from the Return Setup dialog and drop it onto an unused sample slot. The sample slot shows a carmine bar across it when you are able to drib the map.

3ds Max asks if this should be an example or a re-create. Brand sure Instance is selected, and and so click OK.
- Close the Render Setup dialog.
- Drag the sample slot with the Glare shader into the active View.
Once again, 3ds Max asks if this should exist an instance or a re-create. Make certain Instance is selected, and so click OK.
- In the active View, double-click the Glare node so you can see its parameters in the Parameter Editor console to the right.
- On the Glare Parameters rollout, change the value of Spread from ii.0 to 0.5.

- Close the Slate Textile Editor.
- Make a
 clone of the existing rendered frame, then return the scene.
Rendered scene with Glare effect added to light sources
Compare the two images to encounter the Glare effect. This event is most pronounced on the suspended lamp over the jeep.
- Close the Rendered Frame Windows.
Add lights to the interior of the barracks on the right:
- Activate the Top viewport, then
 zoom and
  pan until the far-right barracks comes into view.
- On the
 Create panel, click
  (Lights). On the Object Blazon rollout, click Complimentary Light to turn it on.
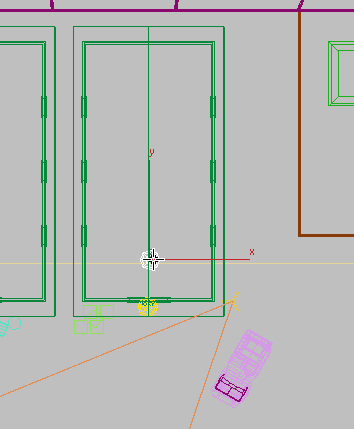
 - Place the new light by clicking the noon of the barracks roof, near the entrance.
- Actuate the Forepart viewport,
 zoom to run across the forepart of the right-manus billet, then apply
  (Select And Motion) to raise the light object on its Y centrality until it is above the flooring but below the roof, as shown in the analogy.
The interior barracks lights are fluorescent, so the new light object should be suspended about two feet (about 0.6m) from the ceiling.
- Become to the
 Alter panel. On the Templates rollout, open up the drop-downward list and choose 4ft Pendant Fluorescent (Web).
Now you lot will set the color the light will cast.
- On the Intensity/Color/Attenuation rollout, brand sure the preset Light radio button is chosen (every bit opposed to color temperature: "Kelvin"), then choose Fluorescent (White) from the Light drop-down list.

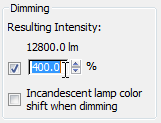
The scene calls for a standard fluorescent fixture consisting of 4 tubes. Rather than physically re-creating each tube, y'all can only bump up the intensity of the single light object by a gene of 4.
- In the Intensity/Colour/Attenuation rollout Dimming grouping, change the value of Resulting Intensity to 400% (pct).
- In the Top viewport, make 2 instances of the fluorescent light. Distribute them evenly along the length of the barracks.

- On the Shadows rollout, turn shadows On then the ceiling lights will cast shadows.

- Activate the Camera01 viewport and render the scene again.
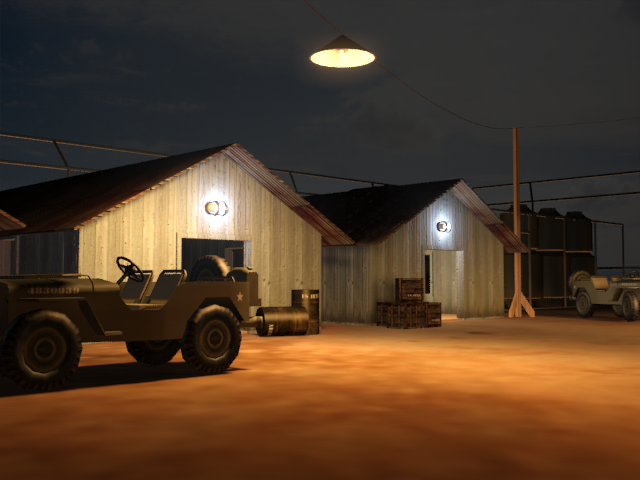
Rendered scene with interior lights added to the barracks on the right
The inside of the right-paw barracks is now illuminated, with light spilling out of the entrance.
Save your work:
- Salvage the scene as my_army_compound_nighttime_completed.max.
Summary
In this tutorial, you learned how to use photometric lights to illuminate a nighttime scene. You lot specified the color of the light source and defined how shadows were cast. Yous also learned how to accept a background image, adjust its output, and employ information technology as a background to the night scene. Finally, you saw how a mental ray Glare shader tin be applied to a light object to better the realism of the rendering.

How To Add A Realalist Background In 3ds Max,
Source: https://download.autodesk.com/us/3dsmax/2012tutorials/files/GUID-38106872-612A-400A-8E96-71847AA83BC3.htm
Posted by: owenscrind1984.blogspot.com
0 Response to "How To Add A Realalist Background In 3ds Max"
Post a Comment